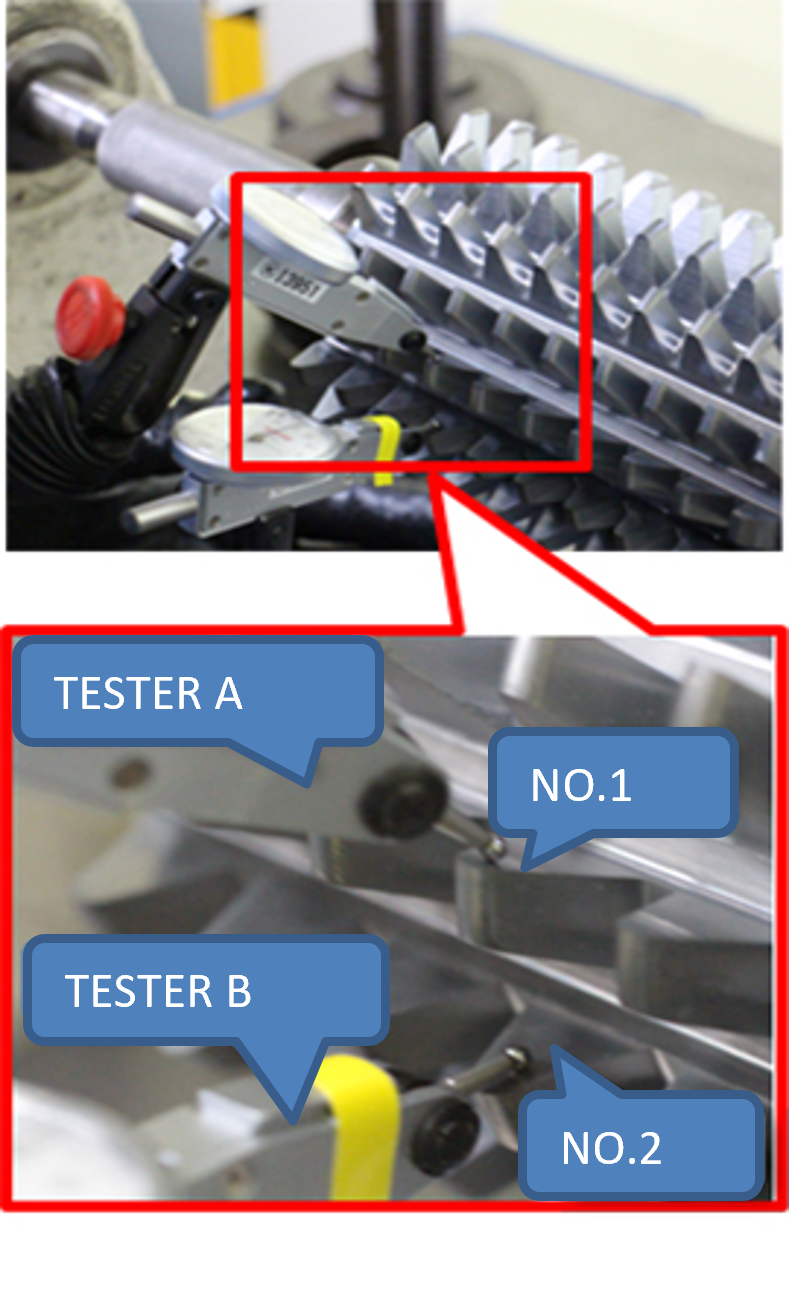
Inspection method of resharpening accuracy for hobs - Indexing of gashes
In order to use hobs while maintaining accuracy and life,
it must have the correct resharpening accuracy.
Therefore, it is important to evaluate the hob accuracy after resharpening.
The measurement method is described in JIS B4355, test number 5-7,
However it seems a little abstract and difficult to understand.
So we introduce a practical method that users can measure without a specialised measuring device.
Measurement item / Indexing of gashes
■Devices
- Bench Center 1set
- Straight mandrel suitable for hob hole 1set
- Dial test indicator (Lever type) with magnetic stand Min scale 0.002mm 2sets
■How to measure
- 1.Mount the hob on the straight mandrel and set the mandrel on the bench center.
- 2.Set 2 probes of tester at the cutting face center of 2 aligned teeth along the same thread.
* measuring start tooth can be any tooth. (This time, tester A is set on teeth No.1 and tester B is on No.2) - 3.Adjust two tester dials to "0" (Do not touch the tester after adjustment)
- 4.offset the probes by moving the hob in the axial direction and pass them over the thread then locate them at next groove.
- 5.Do No.2
- 6.Rotate the hob until Tester B dial shows "0". (it is easy to adjust by hitting the hob with a pen)
- 7.Read the scale of tester A.
- 8.Do No.4 to 7 continually with all other grooves.
- 9.Read the scales of tester A and B if they are "0" at the No.3 position.
- 10.Calculate the value as allows,
Single indexing error
- A) Calculate an average of measured values (tester A readings)
Avg=(No.1+No.2+……..+No.n)/n - B) Measured value - Average value = Single indexing error
- C) Max. Single indexing error is used for acceptance decision.
Cumulative indexing error
- A) Cumulative indexing error (Cumulative calculation of the single error)
=S1, S1 + S2, S1 + S2 + S3…. - B) Cumulative Measured value (AN) - Cumulative Average value (AVN)
= Cumulative indexing error (SN) - C) Max. Cumulative indexing error is used for acceptance decision.


刃付精度が及ぼす影響は製品ページの刃付けの注意点を参照ください。
Caluculated result / 16 flutes hob
| Tooth No | Tester A | Ave | Single ind. er. | Cumulative ind. er. |
|---|---|---|---|---|
| 1 | 0 | 1.3125 | -1.3 | -1.3 |
| 2 | 1 | 1.3125 | -0.3 | -1.6 |
| 3 | 2 | 1.3125 | 0.7 | -0.9 |
| 4 | 2 | 1.3125 | 0.7 | -0.3 |
| 5 | 0 | 1.3125 | -1.3 | -1.6 |
| 6 | -1 | 1.3125 | -2.3 | -3.9 |
| 7 | 1 | 1.3125 | -0.3 | -4.2 |
| 8 | 2 | 1.3125 | 0.7 | -3.5 |
| 9 | 6 | 1.3125 | 4.7 | 1.2 |
| 10 | 4 | 1.3125 | 2.7 | 3.9 |
| 11 | 3 | 1.3125 | 1.7 | 5.6 |
| 12 | 1 | 1.3125 | -0.3 | 5.3 |
| 13 | 0 | 1.3125 | -1.3 | 3.9 |
| 14 | 1 | 1.3125 | -0.3 | 3.6 |
| 15 | 0 | 1.3125 | -1.3 | 2.3 |
| 16 | -1 | 1.3125 | -2.3 | 0 |

Max. Single indexing error 4.7μm

Max. Cumulative indexing error 9.8μm
(4.2+5.6 = 9.8)
